Step 1
Start with a square. Here I made a new document 300X300, created a new layer and filled it with a gradient.

Step 2
Press Crtl/Cmd+T to enter free-transform mode.
Right click/Cmd click... when the dropdown menu appears, select SKEW
Click on the right middle square and drag up until you get your desired angle. Press Enter/return to apply the transformation.
Right click/Cmd click... when the dropdown menu appears, select SKEW
Click on the right middle square and drag up until you get your desired angle. Press Enter/return to apply the transformation.

Step 3
Duplicate the layer

Step 4
Enter free transform again (Ctrl/Cmd+t) Right click and this time select FLIP HORIZONTAL.
Drag out the copy to the left. Hold down the shift key to keep the baselines aligned.
You may also want to make this side a bit thinner by clicking the left middle square (node) and drag it in a little bit.
Drag out the copy to the left. Hold down the shift key to keep the baselines aligned.
You may also want to make this side a bit thinner by clicking the left middle square (node) and drag it in a little bit.

Step 5
Create a new layer and make another square and fill it with the same gradient, this time make the lightest color at the bottom left.
 Step 6
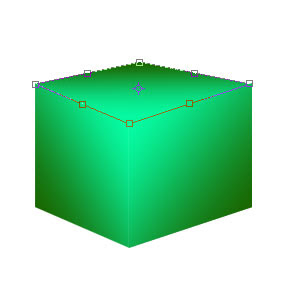
This time while in the free transform mode... when you right click/Cmd click select DISTORT
drag each corner until you get a good match. Be sure the corners fit nice and snug. This step will take a bit of practice to master.
drag each corner until you get a good match. Be sure the corners fit nice and snug. This step will take a bit of practice to master.
Step 7
 Step 8

Finally select the top of the cube.
Image>adjust>LEVELS slide the middle triangle over to the right to darken up the mid-tones. Repeat for the left side. This step adds more realistic lighting to the cube.
Image>adjust>LEVELS slide the middle triangle over to the right to darken up the mid-tones. Repeat for the left side. This step adds more realistic lighting to the cube.
 Step 8
Ta-da A complete cube. Don't limit yourself to just cubes. You can use this effect for all kinds of shapes. You can even construct a cube out of pictures. Just use images instead of the gradients.
For more cool techniques like this on an easy to follow video format check out Photoshop Secrets Special FX
For more cool techniques like this on an easy to follow video format check out Photoshop Secrets Special FX

No comments:
Post a Comment